Showing posts with label baby. Show all posts

Monday, February 20, 2012

A skirt.

While making a run to the fabric store during my recent semi-annual quilting day (All day! With quilters who know 100% more than I do! And door prizes!!), I of course had to buy a sweet kid print along with my brown fabric for my quilt binding. It whispered, "Make me into a skirt," when I saw it in the shop. It didn't hurt that it had chicken-like birds on it; I'm kind of a sucker for poultry.

This was a one-nap skirt, meaning it took me under 2 hours to make it and it was so simple I could do it without much brain power (I make it a rule to turn my brain off during nap time, it's really what's best for everyone.) I found a simple pattern here (I. Love. Oliver & S.) and pulled a ribbon from my voluminous stash...please refer to my comments on craft hoarding in the previous post. I think you should know that this skirt involves cutting fabric from selvedge to selvedge, meaning you just fold in half and cut it to the length that you want the skirt to be (plus 2 inches for seam allowance). It's truly no muss/no fuss, which is a beautiful thing when you are working whilst brain-dead.

This is definitely going to be made up in lots of different prints throughout the various stages of her toddler-hood. And as you can see here, it's particularly good for wearing while giving tune-ups to your rocking horse.

Sunday, July 25, 2010

I've finally knit for Bean.


Elsie Cardi
Originally uploaded by kdmade

You'd think I would have at least knit her a hat, but no. I'm a bad knitting mama. But I finally found a pattern I love, that knit up in only a few days (hello?! Knitting baby sweaters makes me feel like a knitting superhero), and will be perfect for when we all start school in the Fall. Also, I'm a sucker for raglan sleeves. And patterns with no seams to bind.

I used Knitpick's organic worsted cotton and it knit up like. a. dream. Such a fantastic drape, much softer than I thought it would be. Lovely, lovely, lovely.

I chose not to do the crochet trim even though I was planning on doing it in a contrasting color. I just finished knitting and felt it was perfectly sweet the way it was.

These are some faboo vintage buttons I scored somewhere.
I put it on her this afternoon and she smiled and smiled. I think she understands "handmade".

Monday, June 7, 2010

A pinafore.

Man, I want to make this in me-size.
I made up this little pinafore for Bean last night from a Heidi and Finn pattern. I'd seen a bunch of these pinafores at the Art Star Craft Bazaar a few weekends ago and wanted to make them up with my own fabric choices. I found a few patterns but liked this one because of the cute little pocket.
I used the same fabric as I did for the Easter bonnet. I made the pocket out of the contrasting lining fabric and I sewed the back flaps on in reverse so that the you get to see the pretty blue from behind. OK, that's not really why I did it...I just messed up because the wee one and her Dad left me alone in the house and I was feeling frenzied about finishing this before they got home. I didn't pay attention to the directions at that point and by the time I realized it, I was not feeling the seam-ripping vibes. I still think it's cute!

I did everything as instructed, except for the fact that I topstitched the entire piece at the end. This was super duper fun because once you have the whole thing sewn together, you basically have a moebius strip. I just started at the back and worked my way 'round until I came back to the starting point. Yay for the magic of moebius!

This pattern is going to get a lot of use. It's quick and easy (for last-minute gifts) and is simple enough to be personalized. I'm thinking of putting some appliques on future pinafores rather than a pocket. Also, I think the pinafore is nice enough on the inside to be considered reversible, so there's some creative potential in that.
Now I just need to rework this pattern to be grown-up size...somehow I think I'm going to encounter the same issue with all of the Heidi and Finn patterns I sew...

Wednesday, June 2, 2010

Gutless. And a Quilt-a-long!

I am slowly putting together my first knit frog dissection (!) I had the pattern for a while, so long in fact that I think there is now a pattern for a dissected fetal pig and a lab rat (can we get a dissected worm? Please??). After storing my downloaded pattern for a good year or so, I finally knit the frog up, and then puttered around waiting to find a dissection pan to put him in. I think I thought I'd find one at a yard sale or something. But then I thought I'd check out the supply companies that I get stuff for school from and, sure enough, they have dissection pans that don't cost and arm and a leg. I put dark cork in there for the backing because I had some lying around. I'd love to have something that is the color of the blue wax that you usually see in those pans, but I want to get this done in this lifetime, and I think the dark brown is a good background anyway. I need to snag some pins from the lab at school and then needle felt some guts. Of course I will need to do some research because we need to have anatomically correct frog guts. I don't do dissections in my classes so I'm no expert at this. The male and female human reproductive systems? That I could render in felt. Frog innards? Not so much.


I have gotten together the fabrics to have the baby quilt I made OVER A YEAR AGO finally quilted. I'm just going to have it sent out because I don't want my first quilting project to be a quilt top that is really special to me. Quilting is a funny craft because there's this large part of it that I don't feel I can do on my own. Sucking it up and handing it over to someone else to have quilted is proving to be a challenge. But babies grow up fast, I'm now realizing, and I need to get this done quick before she's too big. That, and the last bunch of fabric I had for the backing and the binding turned into her Easter bonnet before I realized what I was cutting into, so I can't have the stuff lying around for too long. It may turn into a sundress.
Getting all of this ready to go has me thinking about quilting again and so I am thinking of joining a quilt-a-long. I wasn't even going to entertain the idea because I work on so very little sleep these days and time in the craft room requires some planning to make sure that Bean is looked after. I'm much more of a spontaneous creator, so planning time to be in the craft room doesn't always work. I just might not be wanting to make something at that time that was set a few days ago. But the fact that this project is jelly-roll friendly AND that I happen to have a jelly-roll lying around means that I'm going to try to give it a shot. If I do it, it'll be the first twin-sized quilt I've made! Stay tuned. Or better yet, join the fun over here!

Sunday, May 30, 2010

A bean turns one.

Well, we did it. Despite three nights of really bad sleep (thank you, baby), we rallied and celebrated Stella's first birthday. The weather was perfect, the dress fit the baby, the buttercream was a hit...yep, big success all around.

I spent some time leading up to the party getting everything ready. The dress was finished way in advance. I made some vintage sheet bunting and got my freezer paper stencil on. The banner says "Stella is" and then there is space for two more flags. I made numbers so that I can just pin them on each year as she grows. I also made a little star for the next nine years...a space saver until she reaches double digits. I made a ton of the number flags because I got a little superstitious-y and needed to make enough so that she can live past 100 if she so chooses. So there are two of every number (waaaaay past 100 if she so chooses). I also made two more strands of bunting because I kept ending up with leftover fabric and so I just cut smaller and smaller triangles. I don't have a picture of the tiniest sized flags (which are only about 1.5 inches long), but here are the mediums. So sweet and fun to have different sizes to hang around the house. If the party ends up in a few different spaces, it's nice to have some simple decorations to tie it all together.

I also made some tissue paper blooms with the piles and piles of tissue paper that I hoard. It was fantastic to use up a bunch of the paper and a bit scary that I had enough to make 7 of these big boys. I checked out Martha's instructions, but used even more layers. Yes, I had that much tissue paper on hand. I used those trash bag wire twisty thingees (another random thing that doesn't often get thrown out in this house) instead of floral wire and just a little thread for hanging. Easy-peasy. And I was all ready to take my big girl pill and toss them after the party, but I discovered that they are actually very easy to refold. So we'll see these decorations again next year, which is a good thing because they were really very cheerful.
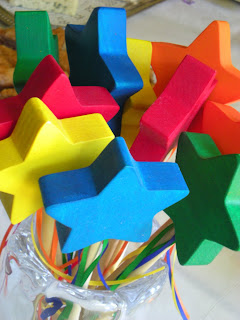
The party favors were a big hit. Lovely star wands from a lovely seller on etsy.
And speaking of non-toxic toys made by actual real people I can email, what is the deal with that evil CPSIA thing? I hope it's died a horrible death because I have found some of the most lovely, safe handmade toys on etsy.
Because not everyone wanted to go home with a magic star wand, I also made sugar cookies and decorated them with royal icing. Except for the fact that I got a little ambitious with my piping and may have sent my right hand into early arthritis, decorating with royal icing is the most. fun. ever. I made a star, an s, and a 1 cookie for each bag and tied it off with some plantable tags from here.I got a lot of compliments on the cake I made. It was the chocolate cake recipe from epicurious that came with that buttercream recipe. I had a mini-freak out moment this morning when the buttercream started behaving oddly. I'd made it a few days in advance and it looked lovely. This morning I took it out of the fridge to warm up a bit but when I whipped it up, it started separating and looking blotchy and ugly. I was nervous to overbeat it, and I thought I might have just messed something up and (I'll admit it) briefly lost hope. With my Dad's nudging, I took a deep breath and whipped the frick out of it in the stand mixer and before long it went back to being fluffy and lovely. Despite the fact that buttercream might look like a little bit of a pain to make, I must say it was worth the effort (it wasn't really that hard), it was so great to be able to make it way ahead, and in the end it was easy to kick around a bit. I say it's the best use of a pound of butter that I've seen in a long time.

The cake was a really nice chocolate cake -- very moist and lovely and I just followed the recipe exactly. I did use slightly smaller pans so I made three layers instead of two, and I filled the layers with raspberry preserves rather than buttercream. I used some leftover royal icing from the cookies for decoration (oh, and I stuck the cookies on mostly because I thought it was a good solution to use one of the stars that had lost a point).
So that's about it. Good food, good friends, and enough pre-planning to make the party day easy and fun. It took me a long time to decide to have a kid and there have been so many steps along the way this year that have made me so thankful that we took the leap and had Bean. As I was putting together this party and having fun with all of the little details I realized that this is probably the most excited I've been for a party I've planned and that as she gets older and actually understands what it's all about, it's going to be even more fun. I can't wait for her to be able to pick a theme and then run with it. I hope that, just once, she lets me get away with doing the farm theme. Hello?! We've got the chicken part down! But truthfully, as long as we can stay away from any kind of a Disney theme, I'll be happy...

Wednesday, May 26, 2010

Why they call it 'buttercream' frosting

Now that the first birthday festivities are less than a week away, I've turned my attention to edible crafting. The cookie dough is in the fridge and will baked off tonight and I made my first buttercream yesterday.

Dear lord, do you know how much butter goes into buttercream frosting? Well, a crapload, to be exact. But, whatever, the first ingredient you start with is egg whites, so how fattening can it really be?? I found a good recipe at epicurious (there are other sites out there with recipes, but this is the one I turn to again and again) and it involved a candy thermometer. Score! I needed a reason to buy one of those (up next, homemade caramels...) and man, was it fun to use. There is something about making candy that really brings my inner dork out. Cooking is always about chemistry, but something about candy-making just makes me feel like I'm in a lab concocting magic potions. I needed to heat the sugar solution to about 140 F which is some stage in candy-making that I haven't memorized yet, but at one point a little bit fell of the spoon I was working with and hardened immediately and I instantly thought (with all of the possible energy and emotion of a complete dweeb): I just made candy! Then I ate it. Yum.So: whipped up egg whites, boiled sugar solution, and 4 (count 'em, 4) sticks of butter later and we have buttercream! That's right, buttercream...which, I believe, is named for its final resting place upon ingestion.

Monday, May 24, 2010

A Whole Year.

Somehow a year of my life just raced by me. Everyone said not to blink when Bean was born because it goes by so fast. Blah blah blah, I thought. I might have even written it here some where: she's never going to grow up. And here we are, getting ready to celebrate her first birthday this week. Sigh.
It's been a while since I've updated this blog here because, as if having an infant wasn't insane enough, we decided we needed to buy a new house...and put ours on the market. Trying to make your house look like you aren't living in it with an 11-month-old may seem laughable to anyone who has had an 11-month-old, and let me assure you, it is. But somehow we have managed to keep the sink basins wiped clean, the toys corralled in bins, and the diaper pail empty so that complete strangers can poke through our house. However, this has required that we remove a lot of stuff from the house that we didn't immediately need which included, I'm sad to say, much of my craft room (What? Not every potential buyer is going to want to use one of the bedrooms to store ribbon and glitter?!)
Of course, Bean's first birthday couldn't be store-bought so I have soldiered on. Actually, decisions such as which fabric to use for the birthday dress have been simpler now that most of my stash is in storage and I've found myself really using what I have rather than going out to buy more or different supplies. This seems oddly counter-intuitive, but there you have it.Her birthday dress is entirely from stash materials, a fantastic matryoshka print that I think I bought as a remnant with some striped shirting that I got at a 4-H festival fabric rummage sale. The fact that I bought not a thing for this dress has me pretty proud, but I must also toot my own horn for a moment because this represents my first Ottobre project. Me! The fake sewer who makes it all up as I go along! Who doesn't really know how to read patterns! Yup, I sewed this Ottobre project. Which has, of course, justified my purchasing another subscription...
Now, there are certain things that I didn't know how to do at all. It took me a while to figure out what a placket was, for instance. But I get that now. There were a few other steps that were just plain mysterious to me so I decided to skip them. Uh, huh...that's how I roll when I'm at the helm of my sewing machine. I figure, if it looks like a dress, hangs on her like a dress, and will last through at least one party, I've done my job. Happily, I think it's going to stay together quite nicely through a few wearings (at least until she outgrows it next week), even with the omitted details. Also, even though I have no business changing a pattern since I'm such a newbie, I decided to make the underskirt all one piece rather than using the cotton batiste and sewing on a panel. I didn't have any batiste and I didn't want to buy anything new. Plus, I had plenty of that shirting fabric so I didn't care about using a whole bunch of it...which, of course, is all relative considering this is a dress built for a person who is about 2 feet tall.
Some accomplishments (besides the fact that I actually sewed an Ottobre project...did I mention that?) include my very first attempt at french seams (poking out on the underskirt here).
I swear, you stick the term french on something and it makes it seem like it's going to be super complicated, but french seems are quite easy and they look sweet. My first pintucks...also super-simple and very pretty for the extra effort. Oh! And I am quite fond of my top stitching which is a step I usually get bored with and muck up. And not really note-worthy, but here's a shot of the back with some lovely vintage buttons to seal the deal.I wanted to make matching bloomers, but I need to bake cookies and a cake (all while making it look like I don't use my kitchen to do things like bake cookies and cakes) so I might let myself off the hook with that one. I made some bunting from vintage sheets which I'll photograph at the party and blog about later because they are so much fun they deserve their own post. And I finally used a bunch of the tissue paper I've hoarded for the past decade to make some of these fantastic poufs. Photos after the party!

Sunday, April 4, 2010

Easter goodness

Our Easter involved bonnets: bunny finger puppets:
and eggs that turned to birds:
Hope yours was as sweet as ours!

Saturday, April 3, 2010

What To Do With Silver Baby Cups

We all took the train into our fair city this week. Our first train trip way back when involved a car seat, but now we just toss Bean in a sling and carry her around everywhere (insert eyeroll from my chiropractor). It's amazing how different she is now after just 10 months has passed. A trip into the city is a lively thing with lots to notice and new people to babble at. The flower show at Macy's proved to be particularly colorful for adults and kids alike. This guy wasn't so impressed with the butterflies alighting on him, though:
On my end, the difference from the passage of time is in what's missing...as in, less of the baby fat (read: my arse) and more of the me that I remember before I gave my body over to a parasite for 10 months. So a trip into the city meant a visit to a favorite place of mine which I hadn't seen in over a year: the Anthropologie sale rack. OK, the entire Anthropologie store is always a thrill to wander even if you aren't looking at clothing, but knowing that I couldn't reasonably fit into anything and didn't know when I'd ever be able to do so again (there is an important and frustrating point in pregnancy where you cannot ever imagine not being pregnant again) made me want to not even step foot in the store. I know...sad, right?

Well this week I fit into a pre-preggers pair of jeans that had even been known to be less than forgiving before I got knocked up, so a celebration was in order. To the Anthropologie sale rack! Although I didn't find anything this time around, just being in the changing rooms with potential wardrobe additions was enough for me and in the long run, who cares about not going away with a new fun article of clothing when there are plenty of bits and bobs for the home for me to drop my cash on?

Fade to the housewares section of the store: I am a bit of a freak about fun hooks (much of my jewelry is hung on my bedroom wall from a series of mis-matched hooks) and I'd been thinking about going through my stash of vintage hooks to create a display for our silver baby cups. When we had just our two baby cups, they didn't seem all that special. But now we have three and that, in my mind, calls for a fun display. Anthropologie to the rescue! I bought our initials, bunged them onto a piece of old floor molding from our basement, and there you have it: a twenty minute project completed in my (old) skinny jeans. Nice.

Thursday, December 24, 2009

The Finish Line.

I made it. I finished Stella's stocking just now, as in, the day before Christmas. It needed to be done in time because I have this thing about having the one stocking, the right stocking, for life. Mine is a crocheted stocking with my name embroidered on it. And it's the right one for me. I looked a lot of stocking patterns before settling on this one. I considered cutting it out of felt and appliqueing it, knitting it, crocheting it, and (in a moment of weakness) buying it. But when I stumbled upon this pattern, I knew it was the one and set about gathering fat quarters. Don't ask me why I waited until this past Monday to start cutting when I knew full well that the stocking had to be done in time for her first Christmas, but I did and so this week was a little, um, crazy. Thankfully, Andrew is on winter break and he happens to be the most sane person I know so my insanity was nicely counter-balanced and I don't think our daughter will suffer any ill effects. At least she can't feel completely neglected by a parent who holes herself up in the craft room for hours on end when there is another parent (albeit, without breasts) who is willing and able to spend quality time raising her, right? Well, whatever, she has a kick ass stocking.

I had to do things a little differently (of course, why make anything simple?) and I cut as many of the strips as I could cut from the striped fabric I made. This meant that I had more patchwork than the pattern called for, so I changed the shape of my stocking to be taller and narrower. I think it's a little too narrow now that the binding is on, but it'll work. Of course my squares aren't lined up perfectly, but that's the kind of quilter I am. Whimsical: that's the look I'm going for (*eyeroll*). I loved doing the simple quilting, and on one side I used white thread while on the other I used a sort of hot pinkish orange. I was originally thinking of bedazzling her name on it with a letter in each square with my faboo kandi thingee, but the squares are really small (1") and I don't want to mess with the simple charm of it. I used white fabric with some silver sparkle to it, so it's definitely got some holiday bling going on. So for now there is no name on it, but that's something I'm willing to figure out for a future Christmas.

I bunged up the binding by putting the loop on the wrong side (insert expletive here), so I just tucked a little loop of some narrower seam binding of the correct side and stitched across the top. It works fine and looks OK.
The real joy of leaving this very important task to the absolute last minute is that I also had to juggle making my other Christmas presents (which I also conveniently left until the last minute) into the schedule. I am not kidding when I say that my planner for this week has entries such as: Piece stocking, cut batting and backing, pediatrician appointment, burn holiday cd. You know it's bad when you have to write the steps in your planner. Anyhoo, I am just about done with the crafting (Andrew is getting a gift that is still on the needles, but he's taking it a lot better than I am) and am now, finally, beginning to get seriously excited about introducing Bean to her first Christmas.

And here is the ornament I made her, which will be going into her stocking:
♥

Wednesday, December 16, 2009

Finger Puppet Pals

Here is a little set of finger puppets that I made for the Bean. The design is from this book here and it's a wonderful example of the super-sweet and simple projects you'll find in it. It took me a while to get started on this project, because I was having trouble biting the bullet and spending a small fortune on felt. I am big on fabric texture, so I generally gravitate towards the 100% wool (read: expensive) stuff and have lots of disparaging things to say about the plastic stuff. So I had all but written off this project when I found myself in Joann's and decided to see what they were trying to pass of as felt these days. I actually found some fabric that was 30% wool, 70% rayon which I must say was quite nice. It was thick, there were good colors, and I came really close to buying it. But my eye was caught by a sale sign for this felt. Or, I should say "felt". 100% plastic! You don't think I even considered buying that, do you? Or maybe I bought 4 or 5 yards worth....Here's what sold me: it is made out of 100% recycled plastic bottles. Hello?! Recycled plastic bottles! I will admit that the fabric has a bit of a plasticky feel to it, but not anywhere near as bad as those craft felt sheets you get at the craft store. Honestly! In addition, the colors were nice and varied and some even had a heathered tone, which I think makes it look all the more like the real deal. For children's items which will see some wear and tear and may not make it to family heirloom status, I think this material rocks. And so does this little guy:For now, these are going to be toys that mama uses to entertain Stella (I'm kind of psycho about keeping plastic out of her mouth), and she's way too young to manipulate finger puppets anyway, so that was always the intention. We've been playing Really Rosie a lot around here lately, so I might try to make sets of characters from those stories so that I can act it out for her while listening to the CD.

Wednesday, November 18, 2009

To Upcycle or Not To Upcycle.

Dang, that's a hard question. Here is a sweet vintage christening gown that Meg gave me a long, long time ago with the directive: just make something out of it, OK? Or maybe not - - it was a long, long time ago. She could have said: I have foreseen that you would have a lovely daughter one day and you should save this for her dolls. Or maybe: here, could you hold this for me while I organize my vintage christening gown collection and safeguard it with your life as it is my great, great, great grandmother's? This is one of the many problems that can arise when, like me, you hoard stuff in your crafty stash, only to be struck with inspiration to use it months or years later.

OK, I'm pretty sure she wanted me to do something with it (but then again, I thought I was supposed to cut up the corduroy backpack, but really I said I was going to try to make a pattern off of it) and I've found some inspiration here. But I can't bring myself to do it.

I think it's The Bean's fault. Before I had a baby I was way less sentimental. I mean, I was pretty sentimental, but now it's off the charts. Thank goodness I know someone who is pregnant now because I'm just trying to give away as much as I can before I get too attached to every sock she ever wore and then have to buy a bigger house to house Stella's baby hosiery. But when I look at this gown, I wonder who made it? Meg, do you know? It doesn't matter really because I love whoever it was for putting their baby in red polka dots for her christening. And for using the sweet, sweet buttons. And for sewing little puff sleeves. Sigh.
So, for now, it's hanging around the house and I'm waiting for it to whisper the answer to me. Hey, little sweet christening gown, do you want a new life or do you want to hang around like you are for a while longer? The fact that I talk to inanimate objects is also The Bean's fault. That's where eleven weeks of bedrest will get you.

Of course, this indecision is only prolonged by the fact that I've reached one of those do-or-die points where I have to clean the craft room up. Most work (except for some knitting) has stopped up there until I can get everything under control, which better happen soon because I have a craft fair coming up and I need to get some things done. Today Stella and I relocated the sewing and knitting books to their own shelves (thank you, Baby Bjorn). I have enough sewing and knitting books to fill an IKEA bookshelf. And there are still more titles in my wish list. Hello, my name is Kristina and I have a craft book problem.

And since any good organization project must be thwarted with equally satisfying procrastination, here is what I've found recently that is making me happy:

- I think I'm starting to understand the meaning of Twitter. As soon as I can sum it up in one hundred and forty characters or less, I'll share it with you.

- There is a website here that helps you source local farms, restaurants, and markets that have pastured meats. Restaurants! Yay!! I can be an omnivore in public again! I found this site through Twitter (see above).

- Haba toys rock my world and I wish I had a hundred million dollars to buy everything they make. Our most recent purchases are this and this. Love.

Saturday, November 14, 2009

Coloring Inside the Lines.

Here is a quickie project (which these days means I get it done in one week) that involved my New Favorite Craft: gold leafing.

I had a print from Art Ghost which I received in a Sampler a million years ago. As soon as I got it, I knew that I wanted to color it, but it got shuffled under papers in the craft room and I didn't see it for months and months. The real issue for this blog post should be that my craft room is such a disaster I can hardly get anything done in there, but I'll try to keep it positive (!)

Here is the print before coloring. I think it's a perfect image to hang in my daughter's room but of course I needed it to be extra-special, so I used gold(en) leaf on the horn and the scales. I must say, I doubted myself for a moment as I was dabbing the sizing adhesive for the leaf on. I have gilded a bunch of our chicken eggs and didn't have any full sized leaf sheets left, just little bits and pieces that I've saved. I thought about how I was going to have to wait a while for the sizing to dry/Stella to take a nap again, how I'd have to delicately pick through little shreds of leaf to get it onto the image, and how I didn't really know how it would all turn out in the end. I haven't sprung for the real deal gold leaf yet, so maybe this fake stuff just wouldn't look right. And maybe it would prove to be too much of a pain to deal with the little shreds and it wouldn't look even and smooth in the end. I had a what-would-Martha-do moment where I mentally kicked myself for not having just gone the glitter route, but once I started the actual leafing process, it all went quickly and smoothly and I'm quite pleased with the results.
All of this serves as a reminder that: a) even though I am a grown up, it is still fun to spend time coloring, and b) buying and hoarding those disposable foam brushes whenever they go on sale is a terrible, terrible thing to do for the environment, but they are so dang handy. In this case, I used one to brush off the excess leaf and it was muy effective, and c) that ex-boyfriend I had in high school who remarked that I liked anything as long as it was shiny was right on the money (though I remember really being surprised by that revelation...I thought I was more of a muted/matte, down to Earth kind of girl). One of these days I am going to drop the dough and buy a pack of real gold leaf and then look out...I shall turn everything golden.

Wednesday, November 11, 2009

It's Electric!...or not...

Much of today was spent watching my Dad rewire this fantastic salvaged chandelier for me. I love, love, love it. It was a little tricky to rewire as it used a small gauge that is difficult to find (my Dad ended up using some bell wire for one part) and it also was apparently protesting being hooked up again as it blew a few fuses and there were definitely some sparks flying once or twice. Luckily, my Dad is a trained electrician, so nobody died or burned a house down. Thanks Dad (for the chandelier and the non-burned-down-house!) I now need to throw a dinner party in honor of our new dining room lighting.

In other news, I finished up the bead board for the bean (that's a mouthful). They are totally wonky and handmade, but it makes me love them more. There are un-centered holds, shapes that go a little askew, and a dye job that is less than perfect. I used these veggie dyes from Whole Foods (thank you WF for stocking more and more decorating supplies that aren't filled with creepy chemicals) and just diluted them a bit (maybe 50/50, but I totally didn't measure). I rolled the shapes around in the dyes and let them dry for a few days. The yellow, red, and blue are straight from the bottle. The orange was made with yellow and red in a ratio of 10:1. I left the final set natural, but only after trying to get a good green or purple from the set, to no avail. Truthfully, I didn't spend too much time tinkering, so it probably can be done...or maybe the colors just didn't look right on the wood but they'd come out fine in a white frosting.

After the dye dried, I sanded it a bit which was an important step because it evened out the color a lot. It also pulled some extra color off of the edges of each piece which gave a sweet vintage feel to them. I applied two coats of shallac (sanded lightly in between each coat) and then glued the thin shapes down to the board.

Oh, and before all of the shallac-ing, I used my wood burner to write a message to the Bean. I used some of the dyes to color it in a little bit, too. This is my second try with the woodburner and this time I had better control because I went sloooooowly. In addition, a light sanding helped to make the burned lines more sharp.
Making these took me a while because I am a total newbie woodworker. If I were more proficient with power tools, these could be easily done in a weekend; though finishing takes a little time with drying, so it's not a completely immediate craft. Making these made me wonder why we (as a society) are currently so far removed from making things for our children. I'm kind of tweaky about plastic, so maybe it's just me, but it seems odd to consider going to the store to purchase a toy (which will most certainly be chewed on but was made with toxic materials and will not biodegrade) when creating these was simple and fun. I think it's somehow connected to this pressure I feel as a new parent to have something entertaining at the tips of my baby's fingers at all times...on the stroller, in the car seat, in the bathtub, in the crib...when it seems to me that looking at the world going by from the stroller, or in the car seat, or just playing with the water in the tub will help a child learn to be engaged by simple things and to use his or her imagination to stay entertained. I don't know, maybe it's just an only-child thing but I remember lots of time spent staring out the window on long car trips and thinking up all kinds of stories and adventures, none of which involved stuffed animals dangling within inches of my face. So I feel that parents are getting these messages to buy all of this stuff when really, a good set of blocks can take the place of probably 10 toys with electronic bips and boops because of the imaginary play they will spark. And plus, we won't have to poo all over the environment in order to keep our kids entertained. Alright! End rant. Make more toys!!

Tuesday, November 10, 2009

Hats for Wee Heads.

I finished the trio of baby hats I was embroidering. A few visits the chiropractor, a fair dose of Tylenol, some icing and my back was in good enough shape to continue with this highly athletic craft. Sheesh. They feature a little snippet of Heather Ross fabric (oh, how I love) and some grass and leaves and french-knotted flowers. I kept it simple, but carried the embroidery around to the back (I think pieces never look complete unless you make the back look just as intentional as the front) and then used a simple running stitch to deal with the seam on the side of the hat. Maybe I'm an idiot, but I can't figure out a way to avoid having that seam show when the brim is turned up so I figured drawing a little embroidered attention to it couldn't hurt.These are a ton of fun to make because they go quickly and I think the sky's the limit in terms of embellishing them. You could print on them, or sew them out of funky fabrics, or bedazzle them (in a non-choking-hazard sort of way). Or, as I mentioned before, just leave them as-is. My poor child is still wandering around with the un-embroidered/seam sticking out prototype and she still gets compliments (got one today!) on the little hat.

made. by k.d.